
Do you track malicious infrastructure either from a malware or threat actor perspective? Do you rely mostly on passive databases such as Censys or Shodan for such tracking? Have you tried to perform your own scanning but get frustrated using tools like Curl or ZGRAB2? If yes, then NoWhere2Hide is a perfect tool to add to your arsenal.
NoWhere2Hide is an open-source active scanner tailored for security researchers and professionals keen on investigating malicious infrastructure. It is developed in GO, has a easy to use user interface and on the back-end, leverages ZGRAB2 for scanning and a PostgreSQL database for storing scan data and for detecting C2s.
There are 3 main goals of NoWhere2Hide:
- Empowers threat researchers to create signatures to hunt and identify malicious infrastructure
- Promotes innovative approaches to identifying C2s; steering away from scanning the entire internet
- Offers a structured format and framework for exchanging C2 signatures within our community.
My ultimate aim is to facilitate effortless creation of detection signatures and their dissemination within the community for mutual scanning and detection.
The best way to learn how to use a tool is to just jump right into it, so, I will demonstrate how NoWhere2Hide can be used to build a signature to detect Supershell controllers.
General Setup
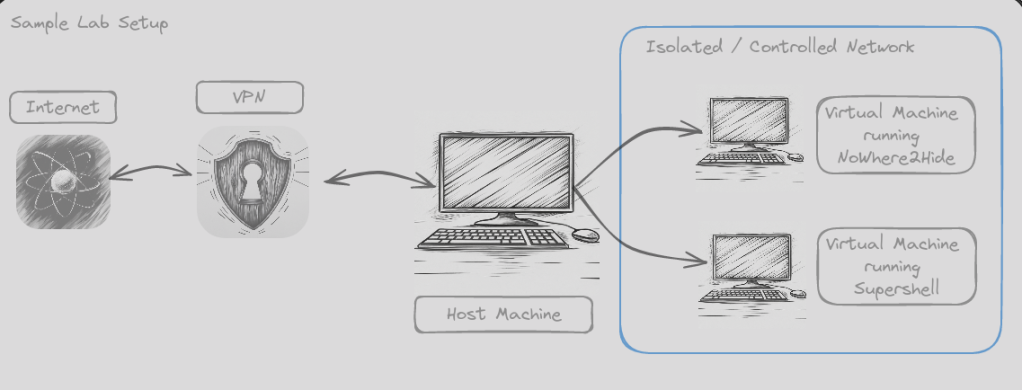
First, I strongly advise against running NoWhere2Hide from your home or business network without being behind a VPN such as Mullvad VPN. Being behind a VPN is a minimal setup. For more advanced setups, I suggest running on a Virtual Private Server (VPS), this is currently where I have mine set up.
For installation, the Read-me is a good place to start, but thanks to xorhex, you now run NoWhere2Hide in a Docker.
Detecting Supershell Controllers
Supershell is an open-source, web-based command-and-control (C2) platform used for remote access and control of infected systems. It utilizes reverse SSH tunnels to provide attackers with a fully interactive shell, enabling them to execute arbitrary code and commands on compromised machines.
I love building detection’s for open-source controllers, because we get to run the controller in an controlled environment and safely interact with it. We will create this detection in three levels:
- Create a basic signature for a Supershell controller
- Run a scan and analyze results
- Expand the targets and add a detection
Level 1: Create a basic signature for a Supershell Controller
The first step is to install Supershell on a virtual machine (VM) in a controlled environment. This is just about as easy as installing NoWhere2Hide, as it can also be run from a Docker. The instructions for setting up and running the Supershell Docker can be found here. Figure 1 shows a simple setup you can use for your signature creation.
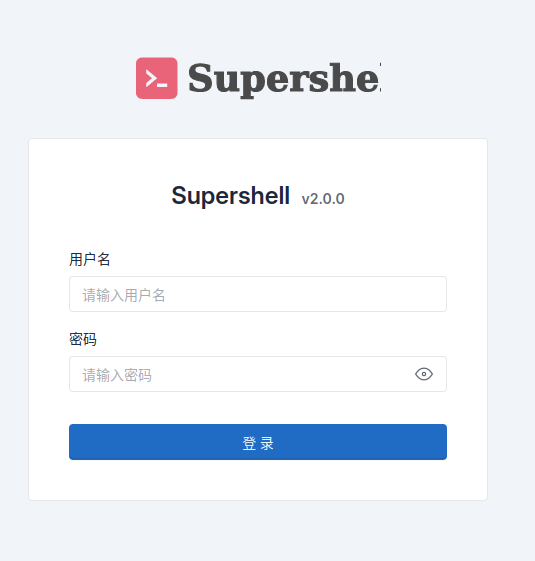
Once Supershell is installed, you can verify it is up and running by going to http://<ipaddress>:8888/supershell/login and you should get a login screen as shown below.
Now that it is up and running, lets create a signature in NoWhere2Hide and see if we can pull the HTTP data. The GIF in Figure 3 demonstrates this process, but essentially, we want to define the following:
- Rule Name: This should be a unique name to identify the malware you are detecting as well as the method used. For this example, we will name the rule “Supershell_Default_Login_Page”
- Malware Name: This will just be the Malware name. In this case it will be “Supershell”
- Classification: Select the best option of malware classification. I believe Supershell falls under the Offensive Security Tools (OST) classification
- Description: Include a brief description of the malware. We will use the description provided at the beginning of this section.
- Targets: The targets define the pool of Internet Protocol addresses / domains that we want to scan. This can be populated from many different sources such as Censys and Shodan. However in this case, we are scanning our local machine so we are going to choose the “IPLIST” target, which allows us to enter a list of Internet Protocol (IP) addresses and ports to scan in the format of:
ipaddress:port,ipaddress:port,ipaddress:port
- Scanning: This section defines the types of scans you want to perform against the Targets. Available options are Banner, HTTP, TLS and JARM. Since Supershell is running as a web-server, we just want to perform a HTTP scan. We already know that by default Supershell does not run under HTTPS and that the login URI is
/supershell/login. So we need to be sure to add those components to the HTTP scanning module options.

Note, at this time we do not have to put anything in the detection part of the signature. As long as the targets and scanning modules are configured we can run the signature and then add the detection later once we actually know what we want to detect.
Level 2: Run scan and analyze results
Next, we want to run a scan using the signature we just created. Running the scan is easy, just go to the “Run Scan” tab, select the rule(s) you want to detect (Supershell_Default_Login) and click “Run”.
When we run this scan, two things will happen:
- The targets from the signature will be retrieved and added to a target pool. In our case, we have the one IP and port where we are running Supershell
- The target pool is then sent to the scanning module to scan the targets with the modules enabled in the scanning section of the signature. For our Supershell example, we are doing a HTTP scan with the URI
/supershell/login.
Now, go to the “Job Status” page. The job you just submitted will be on the top of the list. Click on the “UID” hyperlink, to take you to a search screen to search only the scan data related to the UID you clicked on.
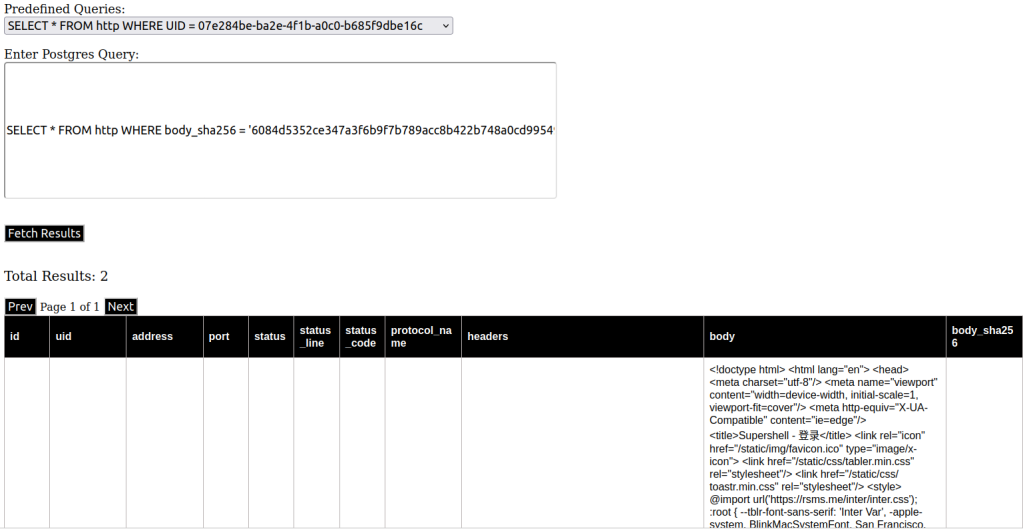
Now, we want examine the HTTP scan data, to do this, we select “SELECT * FROM http WHERE uid=<uid>” from the predefined queries.

Looking at the HTTP body, there are some things we can try. First, we can take the body hash and search it in Censys and see how many hits we get. Using this search, we find 178 results. Scrolling through the results, it seems that most of them are indeed Supershell, and that the body hash is a good indicator of Supershell controllers.
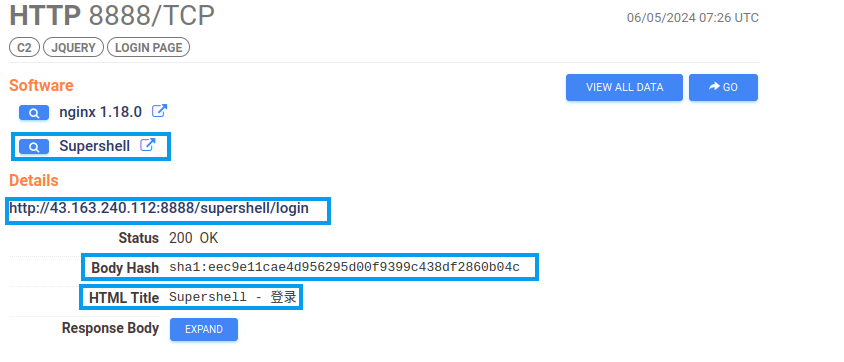
You can see that Censys is tagging this data as Supershell, this is OK, we should still create the signature, as over time we might be throwing targets at this signature that Censys hasn’t scanned yet which will give us net-new findings.
Level 3: Add More Targets and Detection
Let’s now add our Censys query as a target in our signature to increase our pool of targets to scan. We also need to add our detection query to the signature so that we can mark our findings as Supershell.
Building the detection is a exercise in PostgreSQL database searching, which, I am admittedly still learning. Most of the detection’s in NoWhere2Hide come from a PostgreSQL query that searches the scan data to identify malicious infrastructure.
The query we want to use here is:
SELECT * FROM http WHERE body_sha256 = '6084d5352ce347a3f6b9f7b789acc8b422b748a0cd99549f2ea534e439b8999b'
The below GIF, shows how to add the targets and detection to the signature. Note that for the detection, you do not need the full query, you just need everything after the ‘WHERE’ clause. So for our query above, we only input “body_sha256 = '6084d5352ce347a3f6b9f7b789acc8b422b748a0cd99549f2ea534e439b8999b'" You also need to make sure you select the correct database from the drop down, which is “http” in this example. The completed signature can also be seen here.

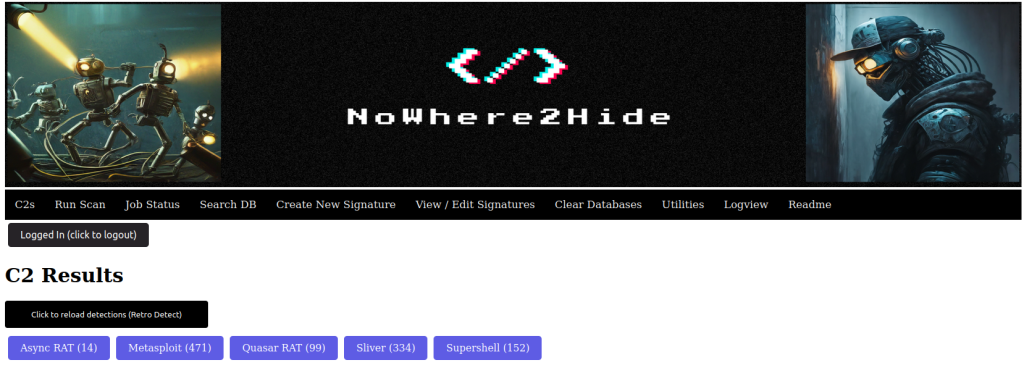
With the additional targets and detection information added, we now need to run the scan again. If all goes right, when the scan completes, we will see the Supershell results in the “C2s” section NoWhere2Hide.
You can see that we didn’t validate the full 178 from our target Censys scan. There could be a couple of reasons for this, one is that some may be running under HTTPS, which our signature does not scan for. We would have to create a different signature with HTTPS enabled. It is also possible that the controllers are not active or were down at the time of our scan.
To recap, to create this Supershell signature we performed the following steps:
- We first set up a controlled lab environment. We installed Supershell on a VM and noted the login page URI:
http://:8888/supershell/login. - Next, we created a signature in NoWhere2Hide. In the signature, we defined the following:
- Targets: The IP address and port of our VM.
- Scanning: We configured the scan to perform an HTTP request to the login page URI(
/supershell/login) - Detection: Since we didn’t yet know the detection logic, we left that section of the signature blank. The purpose of this initial scan was to gather data to inform our detection logic.
- After running the scan and analyzing the results, we discovered that the HTTP body hash could be a reliable indicator of Supershell. We confirmed this by searching for the same hash on Censys and finding that it was associated with other Supershell instances.
- Finally, we refined our Supershell signature in NoWhere2Hide.
- Targets: Results from a Censys query for the identified body hash
- Scanning: We configured the scan to perform an HTTP request to the login page URI(
/supershell/login) - Detection: Uses the body hash to flag Supershell controllers in the C2 tab
You will notice that in this case, the detection is the same logic as how we pull the targets. This does not have to be the case. I classify detection’s in NoWhere2Hide in 3 categories.
- Validation: The target and detection logic are nearly identical. This scan type confirms that targets are active and responding as expected.
- Wide to Pinpoint: Targets are broad, and the detection filters out the noise to pinpoint malicious infrastructure. For example, scanning 100,000 suspicious IP addresses to identify those linked to malware.
- Probe and Response: This method casts a wider net over IP addresses that typically don’t serve default banners, HTTP headers, or body content. However, when probed with specific bytes, they respond in a detectable way.
NoWhere2Hide is a powerful tool that can be used to detect and track malicious infrastructure. It is easy to use and can be run in a Docker container. If you are interested in learning more about NoWhere2Hide, I encourage you to check out the project’s GitHub page.
Stay tuned to see how to use NoWhere2Hide to find PlugX controllers.

Leave a comment